The season is finally upon us. You're ready to bust that classic out and take it for a rip. The only trouble is -- the thing won't start. Or maybe it does, but it barely runs.
It stumbles and backfires, and flat spots throughout operating speeds keep it from going anywhere. You've got fresh fuel, spark checks out, there are no fuel leaks, and the pump's working just fine.
Sounds like a carburetor rebuild is in order.
Carburetor rebuilds are just another part of the routine maintenance schedule for classic car owners. Different vehicles and carburetors have different service intervals, some requiring rebuilds as little as every 100,000 miles. Realistically speaking though, if your vehicle sees regular use in the real world, you can expect to rebuild the carb more frequently. Even those rides that sit for long periods, you can figure on a rebuild at least per year.
You can relax, though. It's really not as intense as the term "rebuild" makes it sound.
So, what is a carburetor rebuild?
Rebuilding a carburetor doesn't always look the same. In some situations, major pieces of hardware need to be repaired or replaced. Throttle blades wear down, metering blocks warp, and the list goes on and on. In fact, sometimes rebuilding the carburetor is more trouble than it's worth, and you're better off letting a pro refurbish it or replace it altogether. That's rarely the case, though.

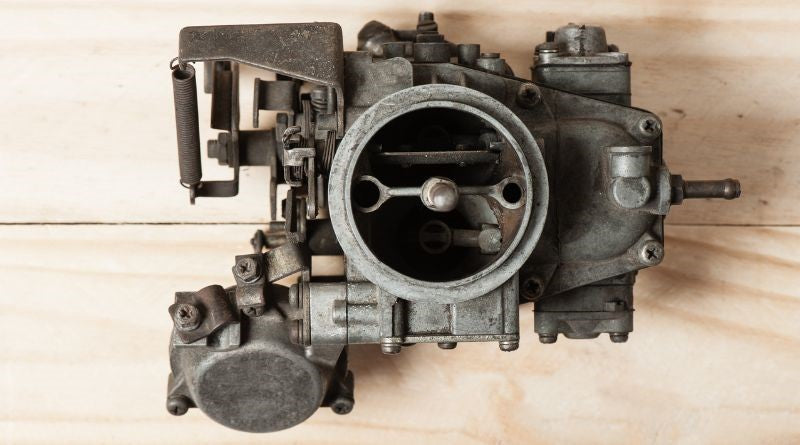
Caption: If an upgrade is in order, turn to the most trusted name in performance. Edelbrock produces a broad range of carburetor kits and parts, guaranteed to work well right out of the box
Most of the time, the many seals in a carburetor are the problem, as are contaminants throughout the system. If a carburetor sits for a long time, the seals dry out, shrink, crack, and fail to function. Carbs that see regular use may experience similar issues, along with dirt and debris that's made its way through the fuel system, clogging things up and wearing delicate parts out.
To rebuild a carb is to go through and replace all of the parts potentially impacted by these issues.
Again, some cases may require major bits of hardware to be replaced. But most of the time, it's as simple as refreshing the carburetor with some new gaskets and small functional parts like accelerator pumps and needle and seat assemblies.
What do I need to rebuild a carb?
It's time to take a sigh of relief. Rebuilding a carburetor isn't that demanding of your shop, skill level, time, or wallet.
Starting with supplies, there are some task-specific parts that you'll need.
Rebuild kits are the central part of the operation, and are widely available. You shouldn't have much trouble locating one for your factory or aftermarket carburetor. It is on you to identify the carburetor and find the right kit, though. It’s also up to you to learn the specific steps required for your carb, and to apply them as needed. Still, these steps are generally very simple and this is a task most beginners can handle.
Along with a rebuild kit, you're going to want to pick up: a chemical dip, some carburetor cleaner, brass brushes, shop towels, and some kind of container to work in, like a cheap oil drain pan.
Exactly what tools you’ll need depends on the carburetor, and there are specialty tools for each model. They aren't exactly necessary, though. While jet removal tools are recommended, a flat blade screwdriver will work just fine. Basic hand tools are all you really need as long as you work carefully.

What you already have does directly impact your overall investment, with the rebuild kit and chemical dip being the biggest hits to your wallet. However, the average rebuild should cost less than $100.
As for how long it's going to take, that really depends on your comfort level and the condition of the carburetor. If a light cleaning is all you need, you can knock a rebuild out in an hour. If it's packed with all kinds of gunk, though, give it two days. We'll explain further in a follow-up How-To Guide, but letting parts soak overnight is essential for especially dirty carburetors.
General Tips
The exact process you need to follow is going to depend on both the type of carburetor you're working on and the condition it’s in. But even if the exact steps taken are different, the overall approach is largely the same. Even if you're comparing rebuilding something like a Holley four-barrel to a simple motorcycle carburetor, a lot of the same information applies.
- The most basic thing to keep in mind with any carburetor is that everything is much more sensitive than you think. Even the smallest bits of debris can cause big problems. So, take your time and clean all the passages out. If you don't, you'll be opening it back up in no time.
- Speaking of which, pay mind to the debris you're cleaning out. Bits of rubber, metal shavings, or rust might indicate other issues in the fuel system, such as a worn-out fuel pump or bad fuel lines. You'll want to replace those parts, if necessary, as you'll only set yourself up for more problems if ignored.
- Parts are also very delicate. Many of the bits you're working with are made of brass or aluminum. Take it easy on them. You easily strip threads or destroy otherwise reusable parts by working too aggressively.
- The last tip to keep in mind is to give the engine a good tune-up while you're at it. If the carburetor needs a rebuild, you might as well check the plugs, air filter, and fuel filter and consider an oil change. Performing all at once will allow each to work off another to produce a clean-running engine that's ready for anything.