Buff out blemishes and learn how to tackle car scratches like a pro.
Other than a full-on collision, there are few things worse for car lovers than finding a scratch on their beloved ride. Whether you have a brand-new car you just drove off the lot, a well-maintained classic, or just a reliable daily commuter, scratching your car’s paint can be the moment that turns a good day bad.
Not to worry, you’re now free to dive down the rabbit hole of DIY scratch repair, where the satisfaction of a job well done meets the thrill of restoring your car’s paint job to a glossy magazine-worthy finish.
The following comprehensive guide will break down the various types of scratches, how to assess their severity, the tools and techniques necessary to tackle the job, and simple, straight-forward steps to properly repair and restore your precious paint. So, grab that tool box, roll up your sleeves, and get ready to restore your car’s paint job to its original glory.
Types of Scratches
When it comes to scratches on your vehicle, not all are created equal. In general, the larger and deeper a scratch is, the harder it is to repair. The factory applies three layers of protection to the body of your car before it is sold:
Primer, which protects the base metal from rust and corrosion,
Paint Base Coat, which gives the car its distinctive color and reflective properties, and
Clear Coat, which is a final thick, transparent polymer or polyurethane coating.

It just makes sense that a scratch that only affects the surface of those three layers (i.e., the clear coat) will be quicker and easier to fix than a deep gouge that goes straight through the primer to the car’s base metal. So, let’s start there.
Clear Coat Scratches
Scratches on your car’s clear coat are caused by all sorts of everyday wear and tear, including just washing your ride. They’re minor and shallow and can often be quickly rubbed or buffed out without the need for touch-up paint. They tend to look like swirls, thin lines, whorls, or short scuffs.
Clear coat scratches can vary in length and depth, but as long as there is enough of the clear coat remaining, they’re relatively simple to remove. Try judging the scratch by running your fingernail over it. If it’s shallow, and doesn’t catch your nail, then you’ve got a clear coat scratch. If you can’t see any shiny metal underneath the offensive mark, you’re also hopefully dealing with a clear coat scratch.
How To Fix It: To repair this type of scratch, start by giving your car a thorough washing with a gentle microfiber mitt. This will remove any dirt and grime that might screw up the repair, and can also help reveal the true dimensions and depth of the scratch.

Once your paint is dry, apply a small amount of quality polishing compound to a soft cloth and gently work it into the scratched area in a circular motion. Be sure to use a light touch – you’re essentially diminishing the thickness of the clear coat to erase the scratch, which means things can go sideways if you’re not careful. When finished, wipe everything down with a clean microfiber cloth.
For minor clear coat scratches, buffing by hand is usually enough, but a machine buffer can do a fast and thorough job if you’re dealing with a lot of surface scratches. It will also provide a more random motion to help prevent swirl marks.
Buffing vs Polishing
Polishing and buffing are two terms that often get tossed around interchangeably in the automotive world.
In truth, polishing is the process that removes dirt, scrapes, scratches, and grease that won’t come out with just regular washing. It’s a surface-level treatment that doesn’t add back any protective value to your car’s paint job.
Buffing, however, actually removes a thin layer of your car’s clear coat in order to remove light scratches and imperfections. Once you’re done buffing your car, it’s a good idea to apply a high-quality car wax as an additional layer of protection for your vulnerable clear coat.
The obvious difference between hand and machine application is that machine buffers and polishers use powerful rotary, orbital, or dual-action to quickly and efficiently remove surface scratches and swirls. They’re also great at delivering consistent results when compared with hand buffing and polishing.

That said, if you’re going to use a machine buffer to fix scratches on your car, it’s best to be familiar with it first. Novice DIYers generally find they get better results by hand buffing while they’re getting comfortable using polishing and buffing compounds. When using a machine buffer, you have to be very mindful of the different angles and curves of your car so that you don’t over-buff and accidentally remove too much of the clear coat. Hand buffing is far more forgiving, so if you’ve never buffed before, start by hand.
Once you’ve decided to make the leap to machine buffing, now you have the arduous and sometimes overwhelming task of deciding which buffer or polisher to purchase. There’s a laundry list of possibilities on the market and each one claims to do a better job than the others. For newcomers, we recommend the entry-level G9 Random Orbital Polisher from Griot’s Garage. It’s comfortable, well-balanced, and intuitive to use.
Paint Scratches
Moving up the road from “Not-so-bad” to “Not-so-great”, we come upon those scratches that extend through the clear coat and into the base color or enamel layer of the paint itself.
These usually occur when your precious paint comes into contact with an abrasive or rigid opponent, like a key, pole, or parking barrier. Although quite common, these are the scratches that usually invoke a couple of swear words when they happen. Have faith, though. Many of these scratches can also be repaired yourself.
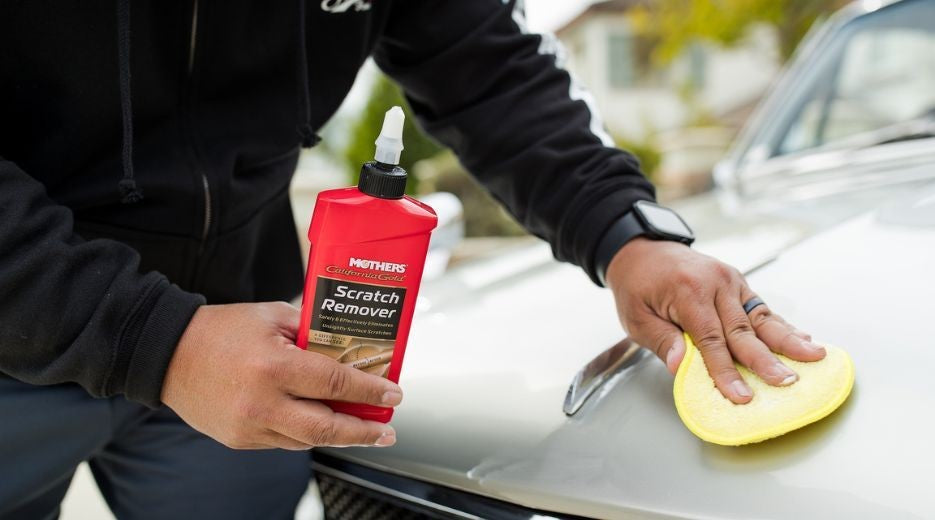
How To Fix It: As with above, start by washing the car to remove all dust and debris. Thoroughly dry the paint with soft chamois or microfiber cloths. You can choose to purchase a scratch repair kit, which includes all the necessary products for fully removing and repairing the scratch, or you can buy supplies at your local parts store and purchase a color-matched paint for your specific car either online or through your dealer.

Start by applying a thin layer of scratch remover to a foam applicator pad. (Check out Meguiar’s Scratch Eraser Kit or Voodoo Ride Scratch Remover if you don’t need a complete kit.) Gently work the scratch remover into the scratched area. Then, hand buff the area with a clean and dry microfiber cloth or try your machine buffer here. Apply wax to restore your paint’s shine and protect the repair.
If the scratch isn’t repaired by these steps, you may need to apply touch-up paint. If your scratch is small -- 2-inches or less -- you can usually just use a touch-up pen, like Dupli-Color Scratch Fix All-in-1. For larger scratches, you’ll likely need to repaint that portion of your car and will probably want to enlist the help of a pro if you want it to look good.
To apply a touch-up pen: Wash and dry your car. Use a clay bar to remove any contaminants and prep a smooth surface for applying the paint. Then, use the abrasive point of your paint pen or a 3,000-grit sandpaper to clear out any dirt from the scratch itself. Next, apply a small amount of paint starting at the top of the scratch. You can always add more later, but if you add too much, you’re in trouble, so go slowly and sparingly. Let the paint dry, and then apply any clear coat that your kit or pen may have come with.
Primer Scratches
Ugh, the primer scratch — the deepest and most heartbreaking of them all. This is a scratch that goes through all three levels of your car’s paint protection and exposes the vulnerable bare metal underneath. This type of scratch needs to be repaired ASAP, since you don’t want the exposed metal to rust and corrode.
How To Fix It: Fixing a primer scratch properly is really best left to a professional, since the area of the scratch is often accompanied by a dent that may also require fixing. In order to properly fix a primer scratch, you’ll need to use sandpaper around it, thus enlarging the fixable area even further. Let the pros handle it.