If you’re new to RVing, or simply outfitting a new-to-you RV, then you’ve likely realized just how quickly a camper’s budget can dwindle. Modifications, accessories, upgraded appliances—they all add up fast. It’s only natural that you might be looking for places to save money or stick with stock equipment. And when weighed against purchases like power generation or safety necessities, the slightly vague and certainly boring-sounding category of “RV Ventilation” probably doesn’t top your to-do list. In fact, that standard roof vent might be looking like a pretty good compromise right about now.
The thing is, proper ventilation is crucial to your comfort when RVing. In addition to helping with temperature control, continuous airflow is key to preventing moisture, mold, and mildew.
Still, the question remains: Do you really need a powered fan in your RV, or will a standard vent do the job? This post will help you understand the differences between the two, when each is appropriate, and what kind of upgrades are worth your consideration.
Understanding RV Ventilation Basics
It’s always wise to understand the system you’re thinking of upgrading, so let’s quickly break down how ventilation works in your RV.
Typically, there are two different types of airflow moving throughout a camper:
- Passive: This is air movement that happens naturally, without mechanical help. Think: wind through open windows, warm air rising through a roof vent, or a gentle breeze blowing through a screen door. Basically, it’s air that’s just…doing its own thing.
- Active: This is air movement that’s forced or assisted by a device, like a fan, vent blower, or HVAC system. Basically, it’s air that is being pushed or pulled with mechanical assistance.
RV roof vents, along with windows, are the backbone of your camper’s ventilation. The vents work a bit like a chimney, giving naturally-rising warm air a direct path up and out of the RV. Windows help provide a breeze by creating a crossflow with any vent(s). Even without an A/C system or electric fan, these two features will help usher in fresh air from outside and draw out stale air from inside.
Active sources of airflow don’t offer quite the same level of fresh air exchange—but they do help (immensely) with temperature control by cooling the ambient air. So, the real effectiveness of RV ventilation comes not from prioritizing one type of airflow over the other, but rather from how you combine them.

RV Vents vs RV Vent Fans
Now that you understand the basics, let’s look closer at the RV roof vent itself. Again, there are typically two different kinds:
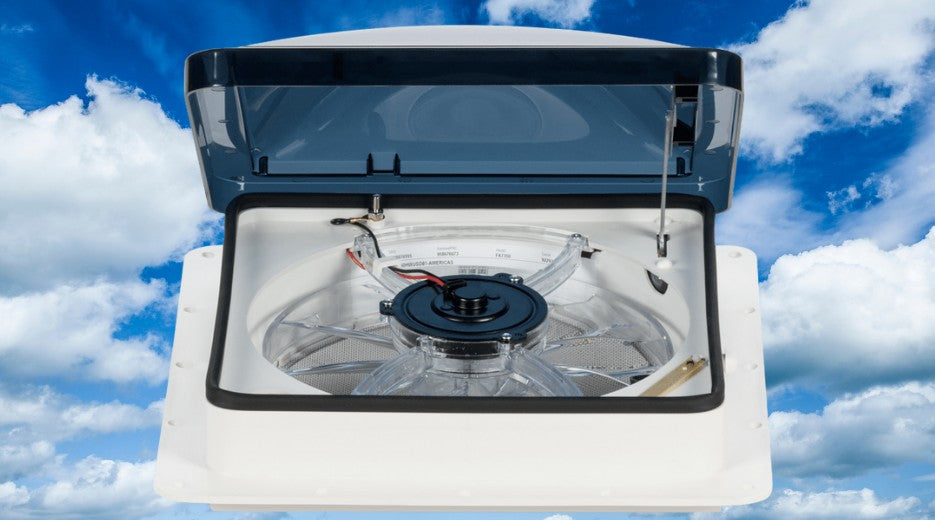
- Standard Roof Vent: This is a passive hole in the roof, often with a screen and cover, that allows for natural air circulation by letting hot, stale air rise and exit. It has a lid that can open and close either manually or automatically, but the ventilation itself does not require any electricity to function.
- Upgraded Roof Vent Fan: This is a powered device that integrates a fan into the roof vent opening to actively push hot, humid air and odors out of the camper. Some models may have multiple speeds and reversible direction, allowing you to exhaust hot air out or draw cool, fresh air in. Vent fans also have lids that may be manual or automatic, however the ventilation itself does require 12-volt power.
While fan-integrated roof vents cost roughly 2-3x as much as standard vents, they provide enhanced airflow and, on some models, special features like built-in thermostats, remote controls, and rain sensors that automatically close the lid.
The verdict? Ultimately, non-powered vents are sufficient for basic ventilation needs. So, if you own a small rig, travel to mild climates, or only hit the road for occasional trips, the standard equipment will probably suit you just fine. If, however, you operate a larger RV, travel frequently, vacation in hot or humid climates, or simply have higher occupancy onboard, then a powered fan is a smart investment.
Upgrading from a Vent to a Fan
Upgrading from a standard vent to one with a fan is definitely doable for a DIYer—even a newbie. Below is a rundown of what’s involved.
Choosing the Right Fan Vent
When replacing any appliance, you need to confirm compatibility. Measure your existing vent opening—most are 14"x14"—but check before buying. The last thing you want is a nice new vent fan that doesn’t fit your RV.
Next, decide on what types of features you would like beyond just the fan. Some standout options you may find appealing include:
- Reversible fan direction, which allows the fan to blow air out of the RV or pull fresh air in.
- Remote control operation, which allows you to operate the fan without having to adjust awkwardly-placed ceiling controls.
- Rain cover, which prevents rain from entering while the vent is open.
- Variable speed settings, which allows the fan to run at multiple speeds instead of just “on/off.”
- Built-in thermostat, which automatically adjusts the fan's operation based on the internal temperature of the RV.

Keep in mind that more features mean higher cost and a slightly more complex installation. Most vent fans run on 12V DC from your RV battery, so check whether your RV already has a wired switch or if new wiring will be needed. If running wiring isn’t your thing, look for fans with built-in fuses or plug-and-play harnesses to simplify installation—or consider hiring a professional.
Something else to consider is noise level. Some fans hum or rattle at higher speeds, so if you’re a light sleeper, you may want to look into quieter models.
To ensure you invest in a fan of good quality with a competitive warranty, stick to popular brands with solid reputations in the RV industry like Maxxair and Dometic.
Removing the Old Vent
Taking out the old vent isn’t complicated, but it does require patience. The goal is to get it out cleanly without damaging your RV’s roof surface.
- Remove the interior trim: Inside the RV, unscrew the vent’s interior trim ring. This will expose the vent mechanism and any wiring. If the vent includes a fan, disconnect the wiring before moving on.
- Loosen the exterior seal: On the roof, gently scrape or peel away the sealant around the vent flange. Use a plastic scraper or even your fingers where possible—your goal is to loosen the vent without gouging the roof surface.
- Take out the mounting screws: Remove the screws securing the flange to the roof. Hold onto these, as some may be reused during installation.
- Lift out the old vent: Gently break the seal between the vent’s bottom and the roof’s surface to safely lift the assembly out of the opening. You may need to pry a bit around the edges with a scraper where the sealant is stubborn.
Prepping For Electrical Work
As noted above, fan vents need 12V power. Most RVs already have wiring for a vent switch, but if yours doesn’t or it doesn’t provide 12V power, you’ll need to run wiring from a nearby fuse or breaker panel. Whether you’re working with a plug-and-play pre-wired harness or facing a slightly more complex install, always disconnect the battery before handling any wiring.
Installing the New Vent
Installing the new vent is all about precision and making a watertight seal. Take your time here—clean prep and careful sealing will pay off in the long run.
- Prep the opening: Scrape away all the old roof sealant so the new unit can sit flat. To encourage better adhesion, wipe down both the vent flange and the roof surface with rubbing alcohol after cleaning.
- Test-fit the new fan: Place the new vent fan into the opening to confirm fit. Use a pencil to lightly trace around the flange—this shows exactly where your clean sealing area should be.
- Apply butyl tape and sealant: Remove the vent. Run a strip of butyl tape under the flange, covering the screw holes. Apply a bead of sealant just inside your pencil line on the roof surface.
- Set the vent in place: Lower the vent into the opening, pressing gently so the butyl tape compresses and sealant oozes slightly around the edges and through the screw holes.
- Secure with screws: Fasten the vent using the provided hardware. Don’t overtighten—you want firm pressure without warping the flange.
- Seal the exterior: Run self-leveling roof sealant (like Dicor) along the flange edges and over all screw heads to lock out water.
- Wire it up: Inside the RV, connect the fan’s wiring—either by plugging into an existing connector or hardwiring per the manufacturer’s instructions.
- Install the interior trim: Cut the plastic interior garnish (trim ring) to match your roof’s thickness. Measure carefully from ceiling to vent at each corner, then trim evenly before installing.
Once you’re done installing, test things out—check speed settings, airflow direction, and any extras like thermostats or rain sensors—and enjoy your new fan!
Did you know…? If you’re not ready for a full vent replacement, some products install directly inside your existing vent from the cabin. They’re easier to add and remove, though they won’t deliver quite the same airflow.
Ready to Take Control of Your RV’s Airflow?
When it comes down to it, the “vent vs. fan” choice depends on your RV’s size, the climates you travel in, and how you use your rig. But if you want true, controlled airflow—not just a cracked window breeze—a powered fan is the upgrade that delivers.
Parts Via carries a wide selection of roof vents, vent fans, and accessories to match your setup. You can even add a vent cover, which lets you keep air moving rain or shine. With the convenience of ship-to-store pickup at your favorite dealer, upgrading your RV’s ventilation has never been easier.